1. 서론 및 얽힌 이야기
내부 시스템에 대해 지속적으로 healthCheck를 하는 Spring Boot기반 서비스를 개발한 적이 있다. DB에 등록된 시스템 리스트를 가져와 순차적으로 healthCheck를 실행하는 방식의 서비스이다.
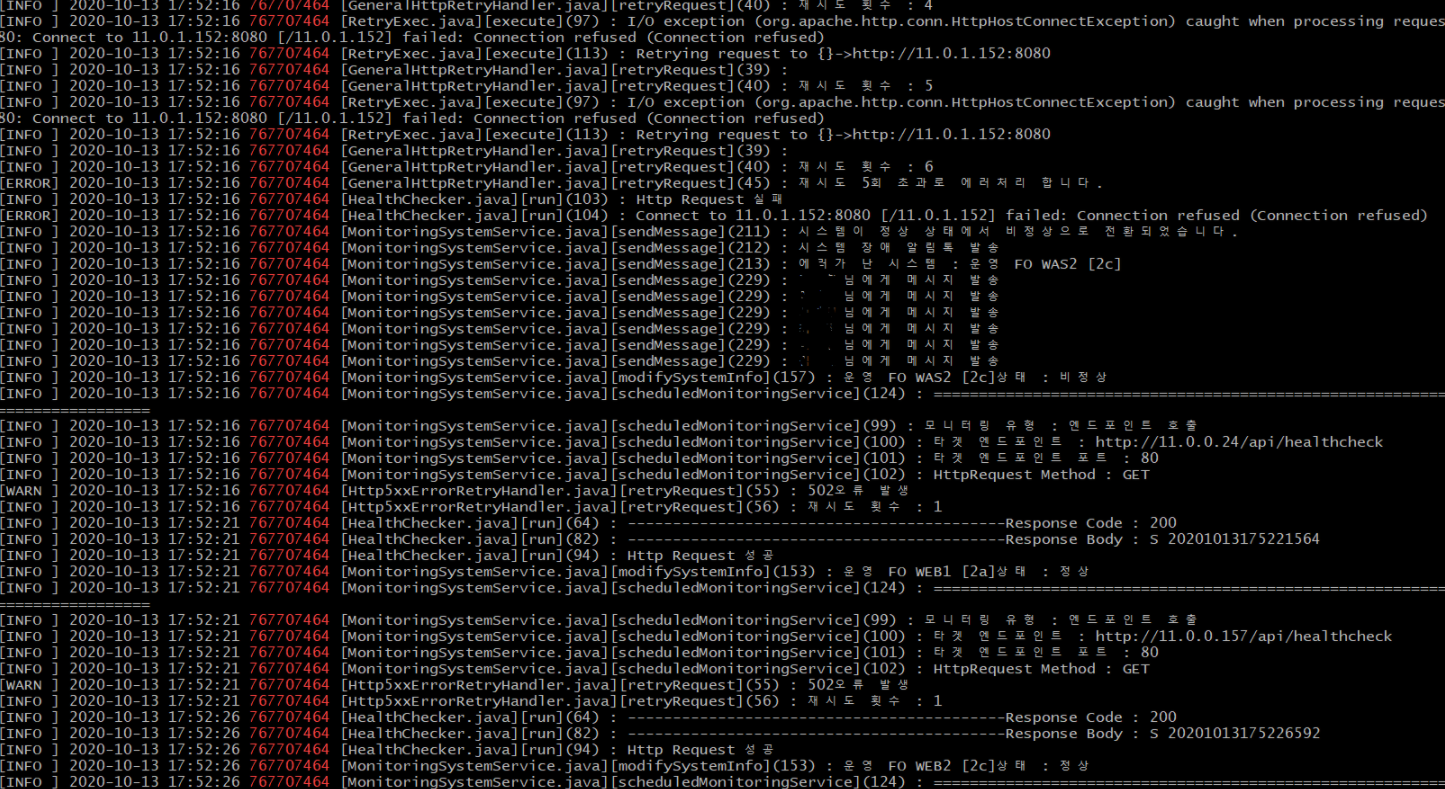
그러나, 10/12 HealthCheck Target별로 HealthCheck 시점의 정합성이 맞지 않는 문제가 발생하였다.
문제 상황 서술 전에 적용중인 시스템 아키텍처 및 HealthChecker 서비스에 대한 개요를 먼저 풀어본다.

- A Group의 WAS에 대해 배포를 진행하였다.
- 배포가 진행되면, 해당 인스턴스로의 직접적인 호출에 대해서는 동작하지 않게 된다.
- static file을 제외한 모든 경로에 대해서 reverse proxy를 통하여 데이터가 was로 전달된다.
- healthCheck를 하는 경로 /api/healthcheck는 was에 설계되어 있기 때문에 was가 동작하지 않으면 web도 동작하지 않는다.
- WAS에 APP이 deploy되기 까지 약 25초의 시간이 소모되며 WEB이 배포되기 까지 5초의 시간이 소모된다.
- 최초의 healthCheck가 실패하면, 5초 간격으로 추가 5회의 재시도를 진행하며 모두 실패하여야만 최종 실패로 간주된다.
위 서술된 환경에서 발생한 문제를 시간 순서대로 다이어그램과 함께 아래에 서술하겠다.

위 같이 같은 시점에서 healthCheck를 진행했으면 같은 시점의 결과가 출력되어야 하나, 순차적으로 실행하는 도중 healthCheck Error로 인해 재시도를 함으로써 다음 healthCheck가 미뤄졌다.
그 결과, WAS와 WEB의 healthCheck의 시점의 차이가 커져 시점에 대한 일관성이 맞지 않는 문제가 발생하게 되었다.
이 문제를 해결하기 위해 delay없이 최대한 모든 target에 대해 비슷한 시점에 실행하여야 했기때문에, thread를 이용함으로써 동시다발적으로 최대한 같은 시점에서 target healthCheck를 진행해보기로 하였다.
그 중 @Async를 활용한 Thread를 이용하여 개선작업을 하기로 하고 문제가 되는 코드를 추려낸 결과, 다음과 같았다.
@Service
public class MonitoringSystemService {

    private final Logger logger = LoggerFactory.getLogger(this.getClass());


    @Autowired
    private MessageRepository messageRepo;

    @Autowired
    private MonitoringSystemRepository monitoringRepo;


    /*
     * 스케줄러 method
     *
     * @parameter
     * @return
     *          Type : void
     * @cycle period : 모든 target의 healthCheck가 끝난 후, 15초 대기
     */

    @Scheduled(fixedDelay = 15000)
    @Transactional
    public void scheduledMonitoringService() throws Exception {


        try {

            this.setPid();

            List<MonitoringSystem> systemInfoList = monitoringRepo.getAllMonitoringSystemList();


            //시스템별 상태 체크 및 톡 발송 실행
            for( MonitoringSystem systemInfo : systemInfoList) {


                switch(systemInfo.getMonFlagCd()) {

                    //RealTime 호출 (엔드포인트 호출형)
                    case "R":
                            logger.info("모니터링 유형 : 엔드포인트 호출");
                            logger.info("타겟 엔드포인트 : " + systemInfo.getMonSysUrl());
                            logger.info("타겟 엔드포인트 포트 : " + systemInfo.getMonSysPort());
                            logger.info("HttpRequest Method : " + systemInfo.getReqMtd());
                            boolean httpRequestResult = HealthChecker.run(systemInfo.getMonSysUrl(), systemInfo.getReqMtd());


                            systemInfo = this.sendMessage(systemInfo, httpRequestResult);
                            this.modifySystemInfo(systemInfo, httpRequestResult);

                        break;

                    //Static 호출 (직접적인 쿼리 실행)
                    case "S":
                        logger.info("모니터링 유형 : 직접적인 쿼리");
                        logger.info("실행 쿼리 : " + systemInfo.getMonSysQury());

                        boolean scheduledSystemStatus = monitoringRepo.getScheduledSystemStatus(systemInfo.getMonSysQury());
                        logger.info("쿼리 업데이트 정상 여부 : " + String.valueOf(scheduledSystemStatus));

                        systemInfo = this.sendMessage(systemInfo, scheduledSystemStatus);
                        this.modifySystemInfo(systemInfo, scheduledSystemStatus);
                        break;
                }

                logger.info("=======================================================================================================");
            }

        }catch (Exception e) {
            logger.error(e.getMessage());
        }

        logger.info("#################################################################################################스케줄러 끝난 시간 : " + getNowTime());


    }


}
public class Http5xxErrorRetryHandler implements ServiceUnavailableRetryStrategy {

    private final Set<Integer> retryableErrorCodes = new HashSet<>(Arrays.asList(500, 503, 502));

    private static final Logger logger = LoggerFactory.getLogger(Http5xxErrorRetryHandler.class);

    @Override
    public boolean retryRequest(HttpResponse response, int executionCount, HttpContext context) {


        int statusCode = response.getStatusLine().getStatusCode();


        if (executionCount > 5) {
            logger.error("재시도 5회 초과로 에러처리 합니다.");
            return false;
        }

        if (retryableErrorCodes.contains(statusCode)) {
            logger.warn(statusCode + "오류 발생");
            logger.info("재시도 횟수 : " + executionCount);
            return true;
        }

        return false;
    }

    @Override
    public long getRetryInterval() {
        return 5000;
    }

}
위 2개의 코드로 인해 최초 health check가 실패한 경우, 다음 healthCheck 대상으로 넘어가기까지 최소 30초 이상의 시간이 소모되기 때문에 동시성이 보장되지 않고 있는 상황이다.
2. 개선코드 및 작업내용
순차적으로 healthCheck를 하는 것이 아닌 thread를 이용하여 동시다발적으로 처리할 수 있도록 하기 위해 가장 먼저 thread를 실행시킬 executor를 생성해주어야 한다.
나는 아래와 같이 AsyncConfigurer를 이용하여 세부설정이 완료된 executor 객체를 bean으로 만들어 어디서든 이용 할 수 있도록 하였으며, 세부 설정은 아래 코드를 참조한다.
@Configuration
@EnableAsync
public class AsyncThreadConfig implements AsyncConfigurer{


    // 기본 thread 개수
    private static int THREAD_CORE_POOL_SIZE = 5;

    // 최대 thread 개수
    private int THREAD_MAX_POOL_SIZE = 10;

    // Thread Queue 사이즈
    private static int THREAD_QUEUE_CAPACITY = 5;

    private static String THREAD_NAME = "healthCheckExecutor";

    @Resource(name = "healthCheckExecutor")
    private ThreadPoolTaskExecutor healthCheckExecutor;

    @Override
    @Bean(name = "healthCheckExecutor")
    public Executor getAsyncExecutor() {
        ThreadPoolTaskExecutor executor = new ThreadPoolTaskExecutor();
        //THREAD_MAX_POOL_SIZE = monitoringSystemRepository.getMonitoringSystemCount();

        executor.setCorePoolSize(THREAD_CORE_POOL_SIZE);
        executor.setMaxPoolSize(THREAD_MAX_POOL_SIZE);
        executor.setQueueCapacity(THREAD_QUEUE_CAPACITY);
        executor.setBeanName(THREAD_NAME);
        executor.initialize();
        return executor;
    }


    @Override
    public AsyncUncaughtExceptionHandler getAsyncUncaughtExceptionHandler() {
        // TODO Auto-generated method stub
        return AsyncConfigurer.super.getAsyncUncaughtExceptionHandler();
    }


    public boolean isThreadPoolAvailable(int createCnt) {

        boolean threadStatus = true;

        if ((healthCheckExecutor.getActiveCount() + createCnt) > (THREAD_MAX_POOL_SIZE + THREAD_QUEUE_CAPACITY)) {
            threadStatus = false;
        }

        return threadStatus;
    }


    public boolean isThreadPoolAvailable() {

        boolean threadStatus = true;

        if ((healthCheckExecutor.getActiveCount()) > (THREAD_MAX_POOL_SIZE + THREAD_QUEUE_CAPACITY)) {
            threadStatus = false;
        }

        return threadStatus;
    }
}
위와 같이 executor를 등록하였으면, 이제 executor에 넣을 비동기프로세스를 작성할 차례이다.
실질적인 처리 로직이 담긴 부분에서 비동기 처리할 메소드에 @Async Annotation을 선언하여 비동기 스레드를 통해 처리되도록 하였다.
다음과 같이 비동기식으로 처리할 메소드에 @Async Annotation과 함께 앞서 선언한 Executor Bean 이름을 명시해주어야 한다.
@Service
public class ThreadExecutorService {

    private final Logger logger = LoggerFactory.getLogger(this.getClass());

    @Autowired
    private MessageRepository messageRepo;

    @Autowired
    private MonitoringSystemRepository monitoringRepo;


    @Async("healthCheckExecutor")
    public void threadExecutor(MonitoringSystem systemInfo) {
        //시스템별 상태 체크 및 톡 발송 실행
        this.setPid();

        try {
            switch(systemInfo.getMonFlagCd()) {

                //RealTime 호출 (엔드포인트 호출형)
                case "R":
                        logger.info("모니터링 유형 : 엔드포인트 호출");
                        logger.info("타겟 엔드포인트 : " + systemInfo.getMonSysUrl());
                        logger.info("타겟 엔드포인트 포트 : " + systemInfo.getMonSysPort());
                        logger.info("HttpRequest Method : " + systemInfo.getReqMtd());
                        boolean httpRequestResult = HealthChecker.run(systemInfo.getMonSysUrl(), systemInfo.getReqMtd());


                        systemInfo = this.sendMessage(systemInfo, httpRequestResult);
                        this.modifySystemInfo(systemInfo, httpRequestResult);

                    break;

                //Static 호출 (직접적인 쿼리 실행)
                case "S":
                    logger.info("모니터링 유형 : 직접적인 쿼리");
                    logger.info("실행 쿼리 : " + systemInfo.getMonSysQury());

                    boolean scheduledSystemStatus = monitoringRepo.getScheduledSystemStatus(systemInfo.getMonSysQury());
                    logger.info("---------------------------------------시스템 정상 여부 : " + String.valueOf(scheduledSystemStatus));

                    systemInfo = this.sendMessage(systemInfo, scheduledSystemStatus);
                    this.modifySystemInfo(systemInfo, scheduledSystemStatus);
                    break;
            }
        }catch (Exception e) {
            logger.error(e.getMessage());
        }
            logger.info("=======================================================================================================");
    }
}
이제 필요할때 마다 비동기식으로 처리되도록 선언한 메소드를 호출해보자.
앞서 선언한 AsyncThreadConfig와 비동기 프로세스에 대해 작성한 ThreadExecutorService를 IOC Container에서 불러온다.
Bean을 불러온 뒤, 다음과 같이 원하는 비동기 메소드를 호출한다.
@Service
public class HealthCheckSchedulerService {

    private final Logger logger = LoggerFactory.getLogger(this.getClass());


    @Autowired
    private MonitoringSystemRepository monitoringRepo;

    @Autowired
    private ThreadExecutorService threadExecutorService;

    @Autowired
    private AsyncThreadConfig asyncConfig;


    @Scheduled(fixedDelay = 15000)
    @Transactional
    public void scheduledMonitoringService() throws Exception {


        try {
            List<MonitoringSystem> systemInfoList = monitoringRepo.getAllMonitoringSystemList();

            for( MonitoringSystem systemInfo : systemInfoList) {

                 try {
                        // 등록 가능 여부 체크
                        if (asyncConfig.isThreadPoolAvailable()) {
                            // task 사용
                            threadExecutorService.threadExecutor(systemInfo);
                        } else {
                            logger.info("Thread 한도 초과");
                        }
                    } catch (TaskRejectedException e) {
                        logger.info(e.getLocalizedMessage());
                    }

            }

        }catch (Exception e) {
            logger.error(e.getMessage());
        }


    }

}
3. 개선 결과
먼저 개선전 서비스 로그를 보면 하나의 스레드를 이용하여 순차적으로 실행하기 때문에, 중간에 내부 서비스가 장애가 날시, 그 다음 서비스에 대해 healthCheck하는 것이 재시도 한만큼 지연되고있다.
그러나 개선된 다음에는 재시도 및 여러개의 요청이 각기 다른 스레드를 통해 진행되는 것을 확인할 수 있었으며 시간의 정합성을 조금 더 개선할 수 있었다.

'IT > Java Spring' 카테고리의 다른 글
| [HikariCP] Possibly consider using a shorter maxLifetime value (0) | 2020.08.12 |
|---|---|
| [Spring] Factory Design Pattern (0) | 2020.08.06 |
| [Spring] @RestController vs @Controller (0) | 2020.02.07 |
| [Spring] Servlet의 동작 과정과 메모리 적재 (0) | 2019.11.19 |
| [Spring] Servlet과 web.xml의 관계 (0) | 2019.11.18 |